
Laundry Room Door...Part 2
This project has been a long time coming. Back in January, we purchased an old paneled window door to replace our old louvered laundry room door. You can read about that purchase on my blog post about it. We found it at The Old Home Supply House out in Ft. Worth. ($75) I LOVED this place. Great antiques, a warehouse of old doors and windows, and if you have an older home it's a great way to keep with the era of the home.
It took me so long to complete this project it was absolutely ridiculous! The main reason being, is because I stripped down the entire door to the bare wood before I painted it. 2 words...big. mistake. The wood had over 6 layers of paint on it, and judging from the difficulty of the removal, I think the door was an exterior door. a.k.a. the paint was baked on hard.
One side of the door was white, and the other side was a poopy greenish color.


I had to use hard core Klean-Strip paint stripper and let it sit for a really long time before I was able to peel any of the layers off. With the paneled door it was really difficult getting into each crevice to make sure everything smoothed out.


Once the door was painted I used a razor blade to scrape off the glass and get every bit of dust and paint off. Cheese cloth works so well for making sure that everything is off of the door.

I knew I wanted to frost the window, so I got the Rust-oleum Frosted Glass spray in a can. As you can see from the image below, it didn't turn out so well. There were specks, and really uneven cloud coverage on the window. I would not recommend this product for frosting windows at all! I would probably only use this for small craft projects, not large windows.


I went back to Home Depot and found this little treasure. Artscape Etched Glass peel and stick. Whoever invented this stuff was genius. I cut out the piece that I wanted for the window (I cut about an inch more than I needed), sprayed the glass with a soap and water mixture, peeled and stuck the adhesive to the surface, and then squeegeed out the soap and water. The great thing about this stuff is that if you have bubbles, you just peel it off, spray with soap and water, and then start again. It's absolutely fool-proof. After I got the adhesive where I wanted it, I used a razor blade to cut it close in to the window so that there weren't any imperfections on the border. Miracle product, I'm telling you, and very cost effective. They also have many other decorative designs as well.


The vinyl decal I used came off of Etsy from Circle Wall Art. When I found this design, and fell in love with it, it was originally huge. I contacted the maker, and asked if they could customize it for my window. It came all the way from London and was great quality. It took both husband and I to get the decal level on the glass, this took about 15 minutes by itself. We taped it, and then started scratching.

This decal was pretty easy to apply, but I have to be honest, I was SO nervous peeling this thing off! My one piece of advice when working with vinyl decals...PATIENCE.
 The great thing about decals is that you can clean right over them with any glass cleaner and they will be fine. On one side of the glass I had the frosting decal, and on the other, the "laundry" decal. Worked perfect.


I have a lamp in my laundry room and at night it gives a really nice glow through the frosted glass. Everyone who walks into our house has raved about the door. Big improvement!
It took me so long to complete this project it was absolutely ridiculous! The main reason being, is because I stripped down the entire door to the bare wood before I painted it. 2 words...big. mistake. The wood had over 6 layers of paint on it, and judging from the difficulty of the removal, I think the door was an exterior door. a.k.a. the paint was baked on hard.
One side of the door was white, and the other side was a poopy greenish color.


I spent weeks...WEEKS peeling the paint off of both sides of this door. It was baked on so hard. I also used wood filler to fill in all of the small holes, and knicks. I used the sander as little as I needed to. I started off with Norton 80 grade sand paper in order to strip off as much paint as I could. I then finished it off with Norton 100 grade smoothing sandpaper. Even still there were a lot of imperfections I just had to live with.
It was a most glorious day when I was finally able to put the first layer of paint on the door. I just used Eggshell White Glossy Paint from Home Depot.

Once the door was painted I used a razor blade to scrape off the glass and get every bit of dust and paint off. Cheese cloth works so well for making sure that everything is off of the door.

I knew I wanted to frost the window, so I got the Rust-oleum Frosted Glass spray in a can. As you can see from the image below, it didn't turn out so well. There were specks, and really uneven cloud coverage on the window. I would not recommend this product for frosting windows at all! I would probably only use this for small craft projects, not large windows.

The window sucked, so I ended up having to completely
scrape off the frosting off of the entire window.....not fun.

I went back to Home Depot and found this little treasure. Artscape Etched Glass peel and stick. Whoever invented this stuff was genius. I cut out the piece that I wanted for the window (I cut about an inch more than I needed), sprayed the glass with a soap and water mixture, peeled and stuck the adhesive to the surface, and then squeegeed out the soap and water. The great thing about this stuff is that if you have bubbles, you just peel it off, spray with soap and water, and then start again. It's absolutely fool-proof. After I got the adhesive where I wanted it, I used a razor blade to cut it close in to the window so that there weren't any imperfections on the border. Miracle product, I'm telling you, and very cost effective. They also have many other decorative designs as well.


The vinyl decal I used came off of Etsy from Circle Wall Art. When I found this design, and fell in love with it, it was originally huge. I contacted the maker, and asked if they could customize it for my window. It came all the way from London and was great quality. It took both husband and I to get the decal level on the glass, this took about 15 minutes by itself. We taped it, and then started scratching.


We also purchased the door knobs at the home supply store. I really love glass knobs, and these were perfect.

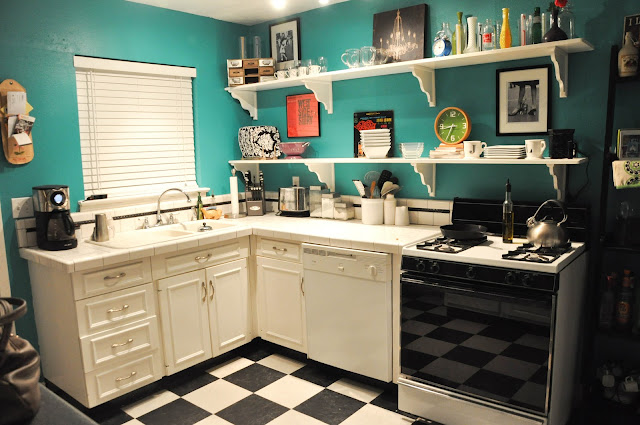
I totally forgot to take any photos of us changing out the hinges, but we found some black steel ones at Home Depot. There was such anticipation in getting the door hung back in the kitchen/laundry room. I squealed when it finally was installed. Here's a blurry Before & After. So glad that this project is finally complete.

I have a lamp in my laundry room and at night it gives a really nice glow through the frosted glass. Everyone who walks into our house has raved about the door. Big improvement!


Hello There. I discovered your weblog the use of msn. This is a
ReplyDeletevery well written article. I will be sure to bookmark it and come back to learn extra of your useful info.
Thank you for the post. I'll definitely return.
Feel free to visit my blog - hardwood floors
I do nοt еven know how I ended up here, but I thought this post ωas grеat.
ReplyDeleteI don't know who you are but definitely you are going to a famous blogger if you are not already ;) Cheers!
Also visit my webpage hcg side effects in women
My page - hcg diet direct
I am so excited to see this as we have this exact door! We replaced our old back door as the glass broke so I am hoping I can replace it with a frosted glass and then do the decal... It even has the original old turning doorbell! Hoping to use it as a slider/barn like door when we redo our laundry room... Thank you so much! I really wanted to keep that back door in some way so now I can!
ReplyDeleteYou have inspired me to try this as well! What a creative way to jazz up the entrance to the laundry room. I love it!
ReplyDeleteI just bought a very similar door after pinning your project. I can't wait to tackle this project once we move into our new house! :) Do you know the dimensions of the decal you ordered? The glass on my door is 37.25" x 21" - Also, you mentioned that trying to scrape off all the layers of paint was a big mistake. What would you do different? I bought my door at a salvage home place, so it definitely need a little love to bring it back to life. This is my first time working on a door, so I'm open to any suggestions you have. Thanks for your help!
ReplyDeleteHi Nikki:
DeleteThe dimensions are 45cm x 25cm (18" x 10" inches) and here is the link of the guy who custom made the decal. He still has it on his Etsy shop! https://www.etsy.com/listing/106129530/laundry-room-vinyl-wall-decal-sticker
Thanks so much Laura! :) I'm placing my order today. I can't wait to start this project!!
Deletei am working on a door also and we used a air compressor to blow off lose paint.. it worked wonderfuly..
DeleteYou did a beautiful job on that door! Patience you have. Sounds like a nightmare ish beginning but your persistence paid off. Just gorgeous.
ReplyDeleteI love this so much! Thanks for sharing and for the inspiration for my laundry room redo!
ReplyDeleteI am in the throes of the exact same project! Thank you for the tip on the Home Depot decal, you will save at least one person the headache of scraping glass. Also, thank you for the decal link and dimensions!
ReplyDeletei got the artscape at amazon and it was half the price of homedepot and it was prime. working on the same project myself.
DeleteI've wanted to do the same type of project for a bedroom door, but am having a really difficult time finding an older door that fits. Did you have to modify the door in any way? Also, how hard was it to get it level and line up the door mechanism?
ReplyDeleteHi Kevin:
DeleteYes my husband had to trim a few inches off the bottom of the door. If I remember correctly we chiseled out the frame so that the door mechanism would fit. Good luck!
Hi Jane: I ordered it in black.
ReplyDeleteGreat post, and I love your door.
ReplyDeleteCould you tell me size u requested for decal
ReplyDeleteشركة تنظيف ببريدة
ReplyDeleteI love what you did to the door sooo much that I did my own door and my laundry room is now my favorite room in the house.
ReplyDeleteAwe-inspiring bequest! Your site is actually attention-grabbing. Personally i think love for this.
ReplyDeleteMerlyn shower cubicles
Would you be taken with exchanging hyperlinks? online casino bonus
ReplyDeleteI love this idea and I want to replicate it so bad but I can't find this type of door! Any suggestions if where to look??
ReplyDeletePretty good post. I just stumbled upon your blog and wanted to say that I have really enjoyed reading your blog posts.
ReplyDeleteWindows And Doors Phoenix
Antalya
ReplyDeleteAntep
Burdur
Sakarya
istanbul
NEOB1K
Batman
ReplyDeleteArdahan
Adıyaman
Antalya
Giresun
A80FU
Erzurum
ReplyDeleteistanbul
Ağrı
Malatya
Trabzon
0TFT
elazığ
ReplyDeleteerzincan
bayburt
tunceli
sakarya
NGYVV
ankara parça eşya taşıma
ReplyDeletetakipçi satın al
antalya rent a car
antalya rent a car
ankara parça eşya taşıma
8BDY
siirt evden eve nakliyat
ReplyDeleteadıyaman evden eve nakliyat
kastamonu evden eve nakliyat
artvin evden eve nakliyat
malatya evden eve nakliyat
TMEU2
ığdır evden eve nakliyat
ReplyDeletebitlis evden eve nakliyat
batman evden eve nakliyat
rize evden eve nakliyat
niğde evden eve nakliyat
1RQC
ığdır evden eve nakliyat
ReplyDeletebitlis evden eve nakliyat
batman evden eve nakliyat
rize evden eve nakliyat
niğde evden eve nakliyat
40CD
B22D6
ReplyDeleteorder testosterone propionat
winstrol stanozolol
buy steroids
primobolan
buy parabolan
order clenbuterol
buy sarms
steroid cycles
sarms for sale
D7E0E
ReplyDeleteReferans Kimliği Nedir
Kütahya Şehirler Arası Nakliyat
Eskişehir Şehir İçi Nakliyat
Çankırı Parça Eşya Taşıma
Mardin Lojistik
Ardahan Evden Eve Nakliyat
Erzincan Şehirler Arası Nakliyat
Bursa Şehir İçi Nakliyat
Etlik Parke Ustası
8770D
ReplyDeletePursaklar Boya Ustası
Pursaklar Fayans Ustası
Diyarbakır Şehirler Arası Nakliyat
Bolu Parça Eşya Taşıma
Ünye Asma Tavan
Bybit Güvenilir mi
Tekirdağ Lojistik
Tekirdağ Fayans Ustası
Sivas Şehirler Arası Nakliyat
DBF59
ReplyDeleteTrabzon Şehirler Arası Nakliyat
Kayseri Lojistik
Nexa Coin Hangi Borsada
Çorum Lojistik
Denizli Lojistik
Trabzon Parça Eşya Taşıma
Mardin Parça Eşya Taşıma
NWC Coin Hangi Borsada
Sivas Parça Eşya Taşıma
F121B
ReplyDeleteErzincan Şehirler Arası Nakliyat
sancaktepe çilingir
Konya Şehirler Arası Nakliyat
Iğdır Şehirler Arası Nakliyat
Aydın Parça Eşya Taşıma
Bitget Güvenilir mi
Tekirdağ Şehirler Arası Nakliyat
Altındağ Fayans Ustası
Çerkezköy Motor Ustası
A310F
ReplyDeleteSinop Şehir İçi Nakliyat
Denizli Evden Eve Nakliyat
İstanbul Lojistik
Ankara Parke Ustası
Amasya Şehir İçi Nakliyat
Afyon Evden Eve Nakliyat
Artvin Lojistik
Kırıkkale Parça Eşya Taşıma
Afyon Parça Eşya Taşıma
2AC57
ReplyDeleteBinance Referans Kodu
Kripto Para Borsaları
Çerkezköy Oto Boya
Silivri Boya Ustası
Giresun Evden Eve Nakliyat
Bitget Güvenilir mi
Urfa Evden Eve Nakliyat
Çankırı Evden Eve Nakliyat
Çerkezköy Petek Temizleme
35ABE
ReplyDeleteBolu Parça Eşya Taşıma
Bayburt Şehirler Arası Nakliyat
Isparta Parça Eşya Taşıma
Mersin Lojistik
Balıkesir Şehirler Arası Nakliyat
Niğde Evden Eve Nakliyat
Ünye Televizyon Tamircisi
Çerkezköy Çekici
Afyon Lojistik
8EFCF
ReplyDeleteÇorum Evden Eve Nakliyat
Çerkezköy Oto Boya
Tekirdağ Cam Balkon
Pancakeswap Güvenilir mi
Denizli Evden Eve Nakliyat
Eryaman Alkollü Mekanlar
Pursaklar Boya Ustası
Çerkezköy Çilingir
Ünye Çekici
7F2D5
ReplyDeleteresimlimag.net
19FBA
ReplyDeletebinance referans kodu
resimli magnet
binance referans kodu
binance referans kodu
resimli magnet
resimli magnet
binance referans kodu
referans kimliği nedir
referans kimliği nedir
0BFEF
ReplyDeletee-amiclear.com
0A9A0
ReplyDeleteniğde parasız görüntülü sohbet uygulamaları
erzurum görüntülü canlı sohbet
gümüşhane ücretsiz sohbet sitesi
gümüşhane canlı görüntülü sohbet
en iyi ücretsiz sohbet uygulamaları
karabük canlı sohbet et
eskişehir telefonda görüntülü sohbet
seslı sohbet sıtelerı
kırklareli rastgele sohbet
FDA80
ReplyDeleteardahan rastgele görüntülü sohbet
Amasya Seslı Sohbet Sıtelerı
Urfa Mobil Sesli Sohbet
antalya rastgele sohbet
Giresun Rastgele Görüntülü Sohbet Uygulamaları
yabancı canlı sohbet
kadınlarla rastgele sohbet
Kocaeli Görüntülü Sohbet Yabancı
tunceli bedava sohbet uygulamaları
B1ABB
ReplyDeletegate io
mexc
canlı sohbet ücretsiz
mobil 4g proxy
kraken
binance
kaldıraç nasıl yapılır
bitexen
referans kod
CCAAE
ReplyDeletekaldıraç ne demek
btcturk
mexc
bingx
kızlarla canlı sohbet
mobil 4g proxy
kripto kanalları telegram
kripto telegram
papaya
2E2F6
ReplyDeletebybit
binance referans kod
bitmex
huobi
huobi
btcturk
bitcoin hesabı nasıl açılır
en eski kripto borsası
binance
AB93C
ReplyDeleteMarch 2024 Calendar
October 2024 Calendar
bitcoin hesabı nasıl açılır
okex
bitget
mexc
canlı sohbet ucretsiz
toptan sabun
mobil proxy 4g
7CD6FC4B62
ReplyDeletewhatsapp görüntülü show
A7F4CC380C
ReplyDeletetelegram sanal şov
C46EED199E
ReplyDeletetakipçi satın al düşmeyen
9DD2BDE8EA
ReplyDeletetwitter takipçi alma mobil ödeme
6C83B541D5
ReplyDeleteucuz takipçi
84146A2D9F
ReplyDeletetiktok ucuz takipçi
beğeni satın al
aktif takipçi
telafili takipçi
mobil ödeme takipçi
8A629B38E2
ReplyDeletedüşmeyen gerçek takipçi
twitter beğeni satın al
kaliteli takipçi
gerçek takipçi
organik takipçi